Claude Code in Ubuntu Touch

Aggiornare Ubuntu Touch alla versione 24.04 Updating Ubuntu Touch to version 24.04
Come portare il Volla Phone 22 da Ubuntu Touch 16.04 (OTA-25) alla versione 24.04, risolvendo eventuali bootloop durante il processo. How to upgrade the Volla Phone 22 from Ubuntu Touch 16.04 (OTA-25) to version 24.04, including fixing bootloops that may occur.
Prima di iniziareBefore you start
- Volla Phone 22 con Ubuntu Touch installatoVolla Phone 22 with Ubuntu Touch installed
- Connessione WiFi stabileStable WiFi connection
- Batteria carica o cavo di alimentazione collegatoCharged battery or power cable connected
- PC Linux con cavo USB (per emergenze)Linux PC with USB cable (for emergencies)
Verifica la versione attualeCheck the current version
Apri il terminale del telefono e digita:Open the phone terminal and type:
system-image-cli -i
Cerca la riga channel. Se vedi 16.04/arm64/android9/stable segui questa guida.
Look for the channel line. If you see 16.04/arm64/android9/stable follow this guide.
Verifica i canali disponibiliCheck available channels
system-image-cli --list-channels
24.04-1.x/arm64/android9plus/stable
For the Volla Phone 22 the correct channel is 24.04-1.x/arm64/android9plus/stable
Avvia il cambio canaleStart the channel switch
Il telefono scaricherà Ubuntu Touch 24.04 e si riavvierà automaticamente.The phone will download Ubuntu Touch 24.04 and reboot automatically.
sudo system-image-cli --switch 24.04-1.x/arm64/android9plus/stable
Se il telefono è bloccato in un bootloop (si riavvia continuamente senza partire), usa questo metodo dal PC Linux. If the phone is stuck in a bootloop (continuously rebooting without starting), use this method from your Linux PC.
Scarica e installa UBports Installer sul PCDownload and install UBports Installer on PC
# Scarica il pacchetto / Download the package
wget https://github.com/ubports/ubports-installer/releases/download/0.11.2/ubports-installer_0.11.2_linux_amd64.deb

# Installa / Install
sudo dpkg -i ubports-installer_0.11.2_linux_amd64.deb
sudo apt-get install -f -y
Metti il telefono in Recovery ModePut the phone in Recovery Mode
Avvia l'installerLaunch the installer
ubports-installer
- Dispositivo:Device: Volla Phone 22
- OS: Ubuntu Touch
- Canale:Channel: 24.04-1.x/stable
- Abilita:Enable: Wipe Userdata + Bootstrap
Installare Claude Code su Ubuntu Touch Installing Claude Code on Ubuntu Touch
Installazione tramite Libertine, un container Ubuntu 24.04 che gira all'interno di Ubuntu Touch. Installation via Libertine, an Ubuntu 24.04 container running inside Ubuntu Touch.
PrerequisitiPrerequisites
- Volla Phone 22 con Ubuntu Touch 24.04 installatoVolla Phone 22 with Ubuntu Touch 24.04 installed
- Account Claude Pro su claude.aiClaude Pro account on claude.ai
- Connessione WiFiWiFi connection
- PC Linux per accesso SSH (consigliato)Linux PC for SSH access (recommended)
Avvia SSH sul telefonoStart SSH on the phone
sudo systemctl start ssh
Genera la chiave SSH sul PCGenerate SSH key on PC
# Genera la chiave / Generate the key
ssh-keygen -t rsa -b 2048
# Premi Invio per tutto / Press Enter for all prompts

# Visualizza la chiave pubblica / Display the public key
cat ~/.ssh/id_rsa.pub
Copia la chiave sul telefonoCopy the key to the phone
Incolla la chiave copiata al posto di INCOLLA_LA_CHIAVE_QUIPaste the copied key in place of PASTE_KEY_HERE
mkdir -p ~/.ssh && echo "INCOLLA_LA_CHIAVE_QUI" >> ~/.ssh/authorized_keys && chmod 600 ~/.ssh/authorized_keys && chmod 700 ~/.ssh
Connettiti via SSH dal PCConnect via SSH from PC
ssh phablet@IP_DEL_VOLLA
Crea il container da ImpostazioniCreate the container from Settings
noble) e attendi il completamento — 5-15 minuti con WiFi.
On the phone go to Settings → Libertine, tap + to create a new container. Give it a name (e.g. noble) and wait for completion — 5-15 minutes on WiFi.
Rendi il filesystem scrivibileMake the filesystem writable
Ubuntu Touch ha il filesystem in sola lettura di default.Ubuntu Touch has a read-only filesystem by default.
sudo mount -o remount,rw /
Trova il percorso del containerFind the container path
find /home/phablet -name "rootfs" -type d 2>/dev/null
# Output: /home/phablet/.cache/libertine-container/noble/rootfs
Entra nel container come rootEnter the container as root
sudo chroot /home/phablet/.cache/libertine-container/noble/rootfs /bin/bash
echo "nameserver 8.8.8.8" > /etc/resolv.conf
If after entering apt-get can't download anything, run: echo "nameserver 8.8.8.8" > /etc/resolv.conf
Aggiorna i pacchetti e installa le dipendenzeUpdate packages and install dependencies
apt-get update
apt-get install -y curl wget git build-essential nodejs npm
Verifica Node.jsVerify Node.js
node --version   # v18.x o superiore / v18.x or higher
npm --version    # 9.x o superiore / 9.x or higher
Installa Claude CodeInstall Claude Code
npm install -g @anthropic-ai/claude-code
added 5 packages senza errori.
Installation complete when you see added 5 packages with no errors.
Verifica l'installazioneVerify the installation
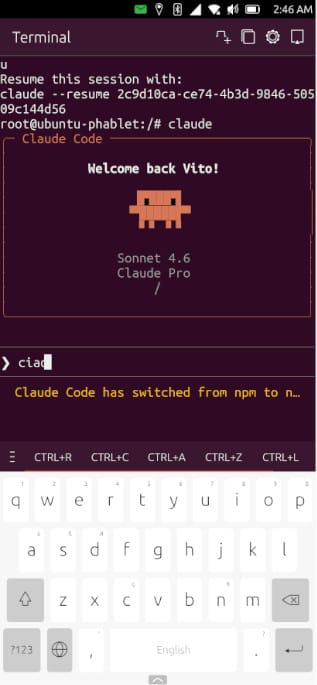
claude --version
# Output atteso / Expected: 2.x.x (Claude Code)
Fix OAuth e primo avvioOAuth fix and first launch
Il container non riconosce localhost di default. Questo fix è necessario per autenticarsi.The container doesn't recognize localhost by default. This fix is required to authenticate.
# Fix necessario / Required fix
echo "127.0.0.1 localhost" >> /etc/hosts

# Avvia Claude Code / Launch Claude Code
claude
Claude Code mostrerà un URL — aprilo nel browser del PC per autenticarti con il tuo account Claude Pro. Scegli 1. Claude account with subscription. Claude Code will show a URL — open it in your PC browser to authenticate with your Claude Pro account. Choose 1. Claude account with subscription.
Come avviare Claude Code ogni voltaHow to launch Claude Code each time
# 1. Abilita SSH / Enable SSH (dal terminale del telefono / from phone terminal)
sudo systemctl start ssh

# 2. Dal PC, connettiti / From PC, connect
ssh phablet@IP_DEL_VOLLA

# 3. Entra nel container / Enter the container
sudo chroot /home/phablet/.cache/libertine-container/noble/rootfs /bin/bash -i

# 4. Avvia Claude Code / Launch Claude Code
claude
Browser su Ubuntu Touch Browser on Ubuntu Touch
Ubuntu Touch include Morph Browser come browser predefinito. Per siti che richiedono JavaScript avanzato è possibile installare Firefox tramite Waydroid. Ubuntu Touch includes Morph Browser as the default browser. For sites requiring advanced JavaScript you can install Firefox via Waydroid.
Morph BrowserMorph Browser
Browser nativo di Ubuntu Touch, basato su Qt WebEngine. Adatto per la navigazione quotidiana.Ubuntu Touch's native browser, based on Qt WebEngine. Suitable for everyday browsing.
Installa Waydroid Helper dall'OpenStoreInstall Waydroid Helper from OpenStore
Installa Firefox dentro WaydroidInstall Firefox inside Waydroid
Aggiornamenti tramite OTAUpdates via OTA
Morph si aggiorna insieme al sistema operativo Ubuntu Touch tramite aggiornamenti OTA.Morph updates together with the Ubuntu Touch OS via OTA updates.